That blank wall in your living room has been staring at you for months, silently judging your decorating paralysis. You scroll through Pinterest, admiring gallery walls and statement pieces that cost more than your monthly grocery budget, wondering if professional-looking wall art is reserved for people with interior designers on speed dial. Here’s the reality: the most impressive wall art often comes from creative DIY projects that cost a fraction of store-bought pieces, and you don’t need artistic talent to pull them off.
The secret to creating wall art that looks expensive lies in understanding a few key principles: scale, composition, and strategic material choices. Whether you’re drawn to minimalist abstracts, botanical prints, or textured three-dimensional pieces, the right DIY approach can deliver gallery-worthy results without the gallery price tag. These projects prove that limited budget doesn’t mean limited style.
Why DIY Wall Art Looks Better Than You Think
There’s a persistent myth that handmade automatically means homemade in the crafty, obvious sense. But professional designers regularly create high-end looking pieces using accessible DIY techniques that anyone can master. The difference between amateur-looking crafts and sophisticated wall art comes down to three factors: choosing the right projects, using quality finishing techniques, and understanding basic design principles.
Consider how art galleries present pieces. They use proper framing, thoughtful spacing, and clean presentation. When you apply these same standards to your DIY creations, the result elevates even simple projects. A canvas painted in a single color becomes a sophisticated statement piece when you choose the right shade and frame it properly. Pressed botanicals arranged with intention and framed under glass rival expensive prints from home decor stores.
The materials matter less than you’d expect. A piece made from paint chips, book pages, or fabric scraps can look just as refined as something made from premium art supplies. The key is executing with precision and presenting with confidence. Clean lines, intentional color choices, and professional finishing transform humble materials into design elements that command attention.
Large-Scale Abstract Canvas Art
Nothing makes a statement quite like oversized abstract art, and creating it yourself is surprisingly straightforward. Start with a large blank canvas from any craft store during a sale, typically running $20-40 depending on size. The beauty of abstract art is that “mistakes” often become the most interesting elements of the composition.
Choose a color palette before you begin. This is the most critical decision for achieving a cohesive, professional look. Pull colors from your existing decor, or use a proven combination like navy, white, and gold for sophistication, or terracotta, sage, and cream for warmth. Limit yourself to three to four colors maximum. More than that tends to look chaotic rather than intentionally abstract.
For technique, consider the palette knife method. Apply acrylic paint generously with a palette knife, creating texture and dimension that catches light beautifully. The thick application looks expensive and gallery-ready. Alternatively, try the pour technique where you thin acrylic paints with pouring medium and literally pour them across the canvas, tilting to create organic patterns. The results are consistently stunning and genuinely unique.
The finishing touch makes all the difference. Paint the sides of the canvas to match your design so it looks polished from every angle. Let it cure completely for several days. If you want extra protection and a professional sheen, apply a clear acrylic sealer. Hang it without a frame for a modern gallery feel, or add a simple floating frame if that suits your style better.
Framed Fabric and Wallpaper Panels
Here’s a designer secret: many expensive framed prints are actually just beautiful paper or fabric mounted and framed. You can recreate this exact look with remnant wallpaper, fabric scraps, or even decorative gift wrap. The result is indistinguishable from retail art pieces that sell for $100 or more.
Hunt for materials at fabric stores’ clearance sections, wallpaper sample books (often free or deeply discounted), or online retailers selling designer wallpaper remnants. You only need enough to fill your frame, so even pricey patterns become affordable. Look for bold geometric prints, delicate florals, or sophisticated textures depending on your aesthetic.
The mounting process determines the professional appearance. Purchase foam core board cut to your frame size at any craft store. Use spray adhesive to attach your fabric or paper to the foam core, working from the center outward to avoid bubbles and wrinkles. Smooth carefully with a clean cloth. Trim excess material with a sharp craft knife for clean edges.
Frame selection matters enormously. A basic frame from a discount store works perfectly, but choose simple styles in black, white, natural wood, or gold. Ornate frames compete with the art and can cheapen the look. If you’re creating a gallery wall, use identical frames in different sizes for cohesion. For a collected, eclectic feel, vary the frame styles but keep the color consistent. Many of the most impressive DIY wall projects succeed because of thoughtful framing choices.
Three-Dimensional Wood and String Art
Adding dimension to your walls creates instant visual interest and a custom, high-end feel. Wood and string art delivers this dimensional quality while remaining surprisingly simple to execute. The geometric patterns possible with this technique look modern and intentional.
Start with a wood board in any size, stained or painted to complement your space. A simple square or rectangle works beautifully, typically 16×20 inches or larger for impact. Lightly sand the surface and edges for a smooth, finished appearance. If painting, use at least two coats for even coverage. If staining, apply according to product directions and seal with polyurethane.
Plan your design on paper first. Simple geometric shapes like triangles, hexagons, or mountain silhouettes work exceptionally well. You can also spell out words or create abstract line patterns. Mark your design on the wood using a pencil and ruler. Precision here is crucial for professional results.
Hammer small finishing nails at each point of your design, spacing them evenly. The nails should be hammered to the same depth for consistency. Then comes the satisfying part: wrapping embroidery floss, thin yarn, or string around the nails to fill in your design. The wrapping can be dense and opaque or sparse and minimalist depending on your preference. Metallic threads like gold or copper add an upscale touch.
This technique allows for incredible customization. Create a constellation of your zodiac sign, an outline of your city skyline, or an abstract geometric pattern. The combination of natural wood, metallic nails, and carefully wrapped string reads as intentional design rather than craft project.
Botanical Prints and Pressed Plant Art
Nature provides endless free materials for sophisticated wall art. Pressed botanicals under glass have graced upscale homes for centuries, and the technique remains just as elegant today. The key is presentation and plant selection.
Collect interesting leaves, ferns, flowers, or grasses. Look for varied shapes and sizes. Delicate ferns, interesting leaf structures, and simple flower silhouettes work better than thick, fleshy plants. Press them between pages of heavy books with parchment paper protecting the pages. Weight the books down and wait two to three weeks for complete drying.
Once dried, arrange your botanicals on quality cardstock or watercolor paper. White, cream, or soft gray backgrounds look most sophisticated. You can create scientific-style specimen displays with single plants centered on each page, or arrange multiple elements into artistic compositions. Use tiny dots of craft glue to secure plants permanently.
Mat and frame your creations behind glass for that gallery presentation. The glass protects the delicate plants and adds depth with its reflective quality. Simple black or natural wood frames work best to keep focus on the botanical elements. Create a series of matching frames for a collected, curated appearance that suggests careful acquisition over time rather than a single craft session.
For variety, try creating simple DIY projects using botanical silhouettes instead of actual pressed plants. Paint leaves and press them onto paper for organic prints, or trace interesting plant shapes and fill them with watercolor for a more artistic interpretation.
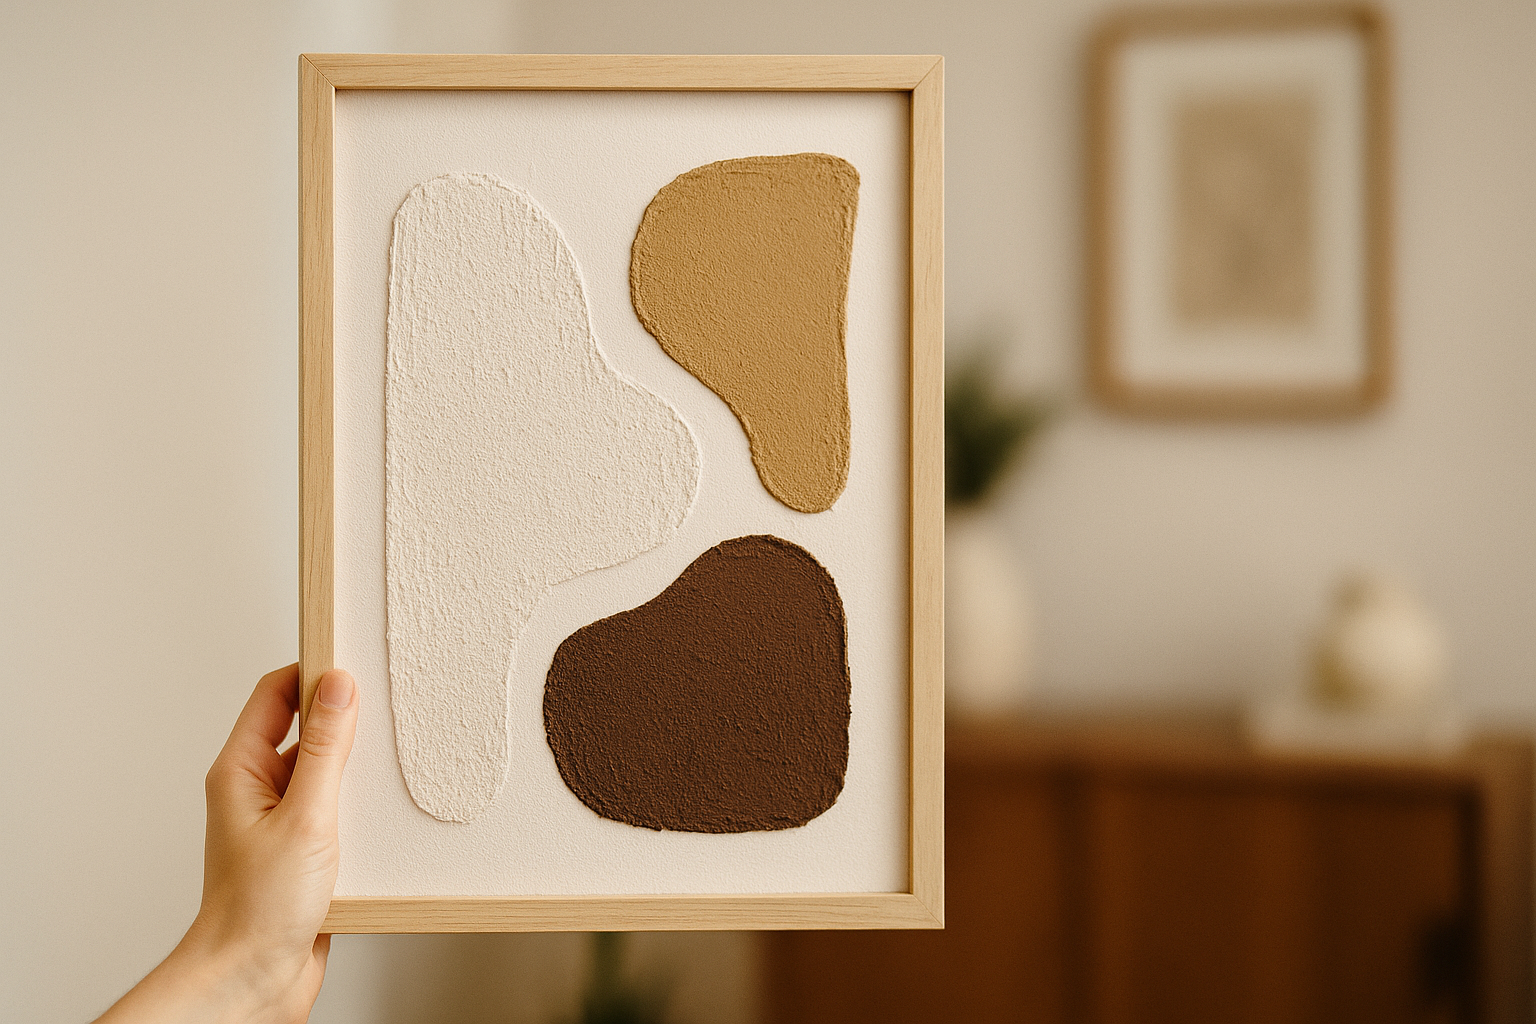
Textured Plaster and Clay Wall Sculptures
Three-dimensional wall sculptures add architectural interest typically reserved for high-end spaces. Using air-dry clay or textured plaster, you can create organic shapes, geometric forms, or abstract designs that cast interesting shadows and catch light beautifully throughout the day.
Air-dry clay is incredibly forgiving and requires no special equipment. Roll it out and cut organic shapes like abstract leaves, asymmetric circles, or flowing curves. You can also press texture into the surface using lace, burlap, or natural elements like tree bark. Mount multiple pieces together for a dramatic installation, or create a single statement piece.
For a plaster approach, apply joint compound or spackling paste to a canvas or board in sweeping, dimensional strokes. Build up layers for dramatic texture. Once dry, paint in monochromatic tones for a sophisticated, gallery-ready appearance. All-white textured pieces look especially upscale and work in virtually any space.
Consider creating geometric relief patterns by taping off sections and building up plaster within the boundaries. When the tape is removed, you’re left with crisp, dimensional shapes that look intentionally architectural. Paint these in your accent colors or leave them pristine white for maximum versatility.
The beauty of textured work is how it changes throughout the day as natural light shifts. Morning light might cast subtle shadows that disappear by afternoon, only to return dramatically with evening illumination. This dynamic quality is something flat art simply can’t achieve, and it’s what makes these pieces feel particularly special and custom.
Gold Leaf and Metallic Accent Pieces
Nothing says luxury quite like metallic accents, and incorporating gold, silver, or copper leaf into your wall art delivers serious sophistication. The materials are more affordable than you’d expect, and the application technique is approachable even for complete beginners.
Gold leaf sheets or flakes are available at craft stores, with imitation gold costing just a few dollars per package. You’ll also need sizing (the adhesive) and a soft brush for application. Start with a simple canvas painted in a complementary color as your base. Navy or deep green looks stunning with gold, while gray or white works beautifully with silver.
Apply sizing in your desired pattern. This could be abstract brush strokes, geometric shapes, or even a stenciled design. Let the sizing dry until it’s tacky but not wet, following product directions carefully. Then gently press gold leaf onto the sized areas. The leaf is extremely delicate, so handle carefully. Brush away excess with a soft brush, and seal with a clear acrylic sealer to prevent tarnishing.
For a more contemporary approach, try creating an ombre effect where gold leaf gradually fades from dense coverage at one edge to sparse flecks at the other. Or create a simple geometric pattern like a diagonal slash of gold across a solid-colored canvas. The contrast between matte paint and reflective metallic creates dimension and visual interest that photographs beautifully and impresses in person.
Metallic accents also work wonderfully combined with other techniques mentioned here. Add gold leaf details to your abstract paintings, incorporate copper accents into your geometric wood pieces, or edge your botanical prints with delicate silver. These mixed-media approaches look collected and curated rather than crafted. If you’re looking for more creative wall art approaches, consider how metallic elements can elevate virtually any DIY project.
Gallery Wall Curation and Presentation
Creating individual pieces is only half the equation. How you present and arrange your DIY art determines whether it reads as professional or homemade. Gallery wall arrangement follows specific principles that interior designers use to create cohesive, impressive displays.
Start by laying out your arrangement on the floor before putting any holes in the wall. This lets you experiment with spacing and composition without commitment. Maintain consistent spacing between frames, typically 2-3 inches. Too close feels cluttered, too far apart feels disconnected. Use paper templates taped to the wall to visualize placement before hanging.
For a formal, gallery-style look, align the center of all pieces at eye level (approximately 57-60 inches from the floor). This creates a clean horizontal line that feels intentional and polished. For a more organic, collected feel, vary heights but maintain consistent spacing. Both approaches work, but mixing the two looks indecisive.
Color coordination across your gallery wall makes DIY pieces look curated. If your pieces include various colors, repeat certain shades throughout the arrangement to create visual flow. Or take a monochromatic approach where all pieces work within the same color family for sophisticated cohesion.
Don’t forget about lighting. Picture lights, track lighting, or even strategically placed floor lamps dramatically enhance your display. Proper lighting eliminates the amateur appearance and creates the gallery atmosphere that makes DIY art look museum-worthy. The shadows and highlights bring out textures and details that might otherwise go unnoticed.
For those just beginning their DIY journey, starting with a few pieces arranged thoughtfully beats overwhelming yourself with a massive project. You might explore quick DIY crafts to build confidence before tackling larger wall art installations.
The Professional Finishing Touches
The difference between DIY projects that look handmade and those that appear store-bought often comes down to finishing details. These final touches require minimal additional effort but deliver maximum impact on the perceived quality of your work.
Wire hanging systems beat sawtooth hangers every time. They distribute weight more evenly and allow for easy leveling adjustments. Install them properly with the wire taut enough that it doesn’t show above the frame when hung. For heavier pieces, use appropriate wall anchors rather than relying solely on nails. A beautifully created piece loses all credibility if it’s hanging crooked or looks precarious.
Backing your framed pieces with kraft paper creates a polished, gallery-quality finish. Cut brown kraft paper slightly larger than your frame back, apply double-sided tape around the frame edges, press the paper smooth, and trim excess with a craft knife. This small detail suggests professional framing and hides any messy backing elements.
Sign your work discreetly on the back or bottom edge. This small act of ownership changes your psychological relationship with the piece. You’re not just someone who made something, you’re an artist who created it. That confidence shows when guests admire your walls, and authentic pride in your work is contagious.
Consider the entire wall composition, not just individual pieces. Include negative space intentionally. Not every inch needs coverage. Strategic empty space lets each piece breathe and prevents the overwhelming, cluttered feeling that undermines otherwise beautiful work. Professional designers know that what you don’t include matters as much as what you do.
Your walls deserve more than mass-produced prints that appear in thousands of other homes. With these DIY approaches, you create truly unique pieces that reflect your personal style while achieving the polished, professional appearance of expensive gallery art. The best part? Every guest who compliments your wall art gives you the perfect opportunity to casually mention, “Thanks, I actually made it myself.” That moment never gets old, and neither will your beautifully customized walls.
Leave a Reply