Your craft supplies have taken over your house. Buttons spill out of drawers, ribbon tangles around chair legs, and you can’t find your good scissors even though you bought three pairs. The chaos isn’t because you’re disorganized – it’s because most craft storage solutions are designed for people who only scrapbook twice a year, not actual crafters who live and breathe creativity. Let’s fix that with organization hacks that actually work for real craft rooms.
The Pegboard Revolution: Vertical Storage That Changes Everything
If you haven’t discovered the magic of pegboard storage, you’re missing out on the single most transformative craft room hack. Unlike shelving that eats up floor space or drawers where supplies disappear into the void, pegboard puts everything at eye level and within arm’s reach.
Start by mounting a large pegboard section on your most accessible wall. Paint it a color that energizes your creativity – bright white reflects light beautifully, while bold colors like teal or coral add personality. Use a variety of pegboard hooks, baskets, and shelves to create customized storage for scissors, rulers, thread spools, and paint brushes.
The real genius of pegboard storage is its flexibility. When you start a new craft or shift your focus from one project type to another, you simply rearrange the hooks instead of buying new furniture. Pegboard also creates a visually appealing display that turns your supplies into decoration. Those beautiful ribbons and colorful threads deserve to be seen, not hidden in a bin under your table.
For maximum efficiency, arrange your pegboard by project type rather than supply type. Create a painting zone with brushes, palette knives, and small paint tubes. Set up a sewing section with scissors, measuring tape, and thread. This approach means you grab everything you need from one area instead of wandering around your room collecting supplies.
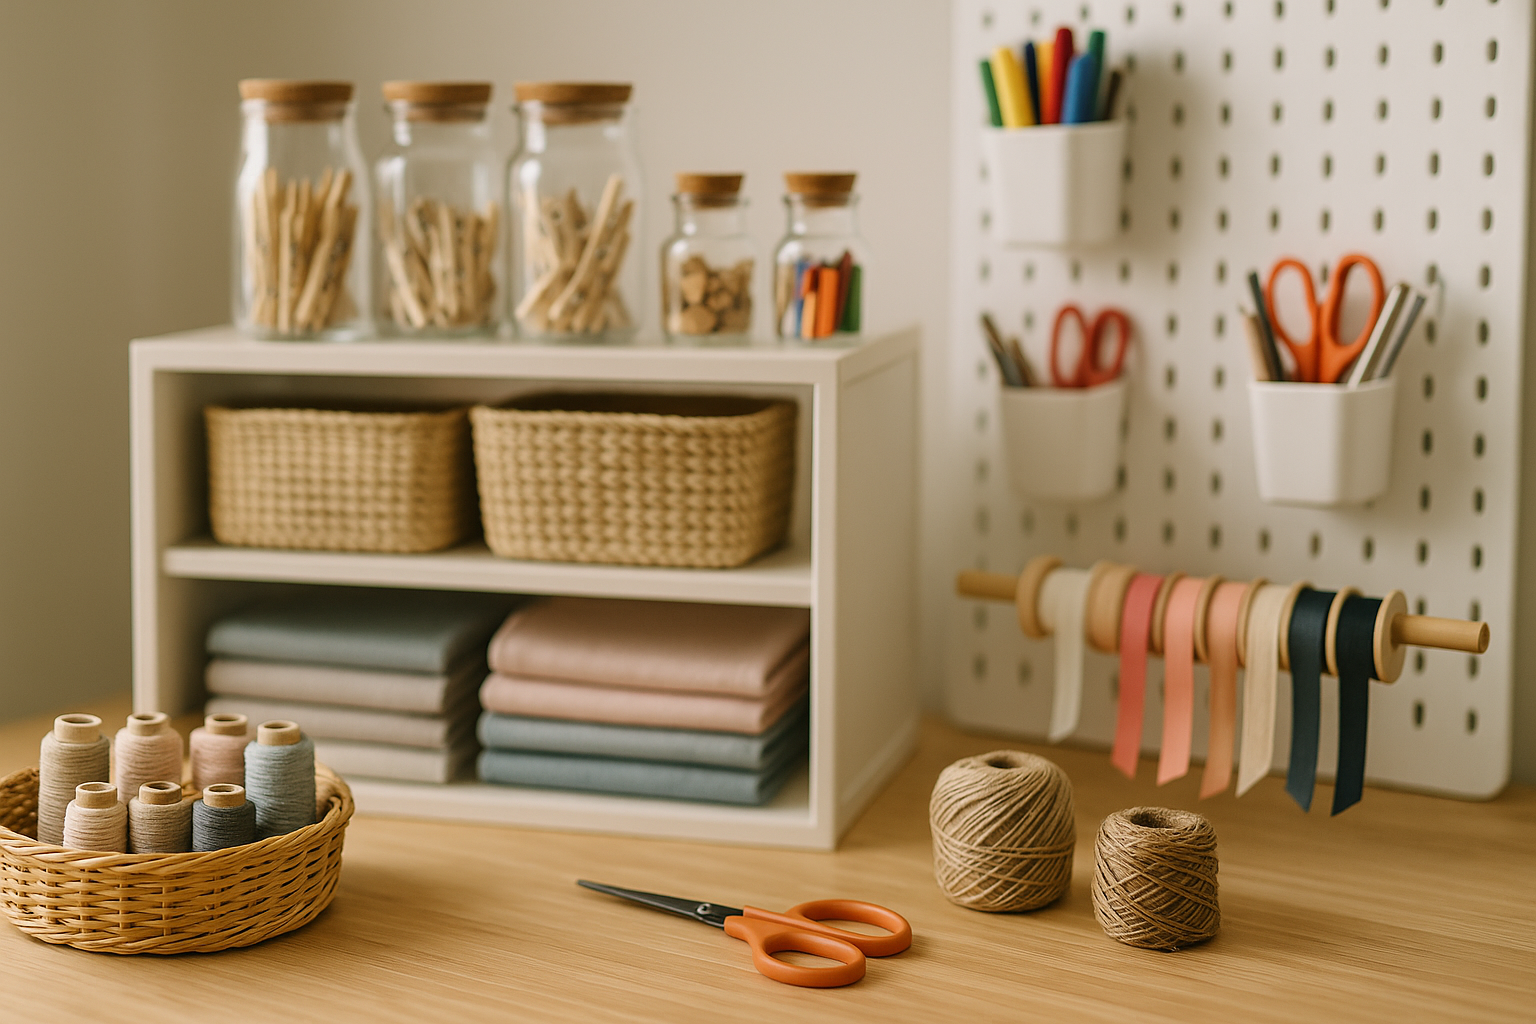
Clear Container Strategy: See Everything You Own
The biggest mistake crafters make is storing supplies in opaque containers, then buying duplicates because they forgot what they already had. Clear storage containers solve this problem instantly while keeping your supplies protected from dust and damage.
Invest in clear plastic bins in various sizes – small ones for buttons and beads, medium ones for fabric scraps, and large ones for yarn or paper. Label each container on both the front and the top so you can identify contents whether bins are stacked or sitting on shelves. Use a label maker if your handwriting isn’t your best craft, or create beautiful hand-lettered labels if calligraphy is your thing.
For particularly small items like sequins, seed beads, or rhinestones, those clear plastic organizers with dozens of tiny compartments work wonders. Fishing tackle boxes and jewelry organizers often provide better value and functionality than products marketed specifically for crafts. Mount them on the wall or stack them on shelves to keep your work surface clear.
One game-changing tip: store supplies in clear containers by color rather than type. All your blue supplies together, all your pink supplies together, and so on. This method works beautifully for fabric, paper, ribbon, and yarn. When you’re starting a project with a specific color scheme, you pull one or two containers instead of sorting through your entire stash. If you’re feeling inspired to tackle other organization projects around your home, simple DIY projects can help you create custom storage solutions for any room.
The Rolling Cart Advantage: Portable Craft Stations
Fixed storage has its place, but mobile storage changes how you actually craft. A rolling cart system lets you bring supplies directly to your workspace, move between rooms based on lighting needs, or pack everything up quickly when life gets messy.
Those popular three-tier rolling carts you see everywhere work perfectly for active projects. Keep your current work-in-progress on the top tier with all necessary supplies, reference materials on the middle tier, and backup supplies or tools on the bottom. When you’re done crafting for the day, roll the entire setup into a closet or corner.
For crafters who work on multiple projects simultaneously – and let’s be honest, that’s most of us – dedicate one cart to each major project. Your knitting projects live on one cart, your card-making supplies on another, and your painting materials on a third. This approach eliminates the frustrating setup and cleanup time that often prevents you from crafting during short windows of free time.
The beauty of cart storage is portability during the creative process itself. You can start a project at your desk with good task lighting, move to the kitchen table when you need more space to spread out, then shift to the living room when you want to craft while watching TV. Your supplies follow you seamlessly.
Maximize Dead Space: Under, Over, and Behind
Every craft room has unused space hiding in plain sight. The key is training your eye to spot these opportunities and transform them into functional storage.
Look up first. The wall space above your desk or cutting table is prime real estate for floating shelves. Install them at varying heights to create visual interest while storing supplies you use regularly but don’t need to grab constantly – extra paper packs, seasonal supplies, or finished projects waiting to be gifted. According to expert organization strategies, utilizing vertical space can double your storage capacity without sacrificing floor space.
The back of your craft room door is another overlooked goldmine. Over-the-door organizers designed for shoes work brilliantly for craft supplies. Store markers in shoe pockets, stash paint bottles, organize stamp sets, or keep rolls of washi tape tidy. The clear pocket versions let you see everything at a glance.
Don’t forget the space under your work table or desk. Rolling drawers or bins on wheels slide underneath and pull out when needed. This spot is perfect for backup supplies, seasonal items, or bulky materials you use occasionally. If your desk has open space underneath, consider adding a tension rod to hang ribbons, lace, or fabric trim.
The area behind furniture can work too. If your shelving unit doesn’t sit flush against the wall, use that narrow gap for long items like wrapping paper rolls, poster board, or canvas panels. Stand them vertically in the space where they stay protected but don’t consume valuable shelf real estate.
Drawer Dividers and Compartmentalization: Taming the Chaos
A drawer without dividers is just a junk drawer waiting to happen. The simple addition of compartments transforms drawers from chaotic catch-alls into organized storage systems where everything has a designated spot.
You don’t need to buy expensive custom drawer organizers. Cardboard boxes from packaging, small plastic containers from take-out meals, or even folded cardboard pieces can create effective dividers. Measure your drawer dimensions, then arrange boxes or containers to create sections for different supply categories. Glue them in place with hot glue if you want a permanent solution, or leave them loose for flexibility.
For shallow drawers, those expandable drawer dividers designed for kitchen utensils work perfectly for pens, pencils, brushes, and small tools. Spring-loaded dividers adjust to fit any drawer width and keep items separated even when the drawer opens and closes. Creative organization techniques like these make it easier to maintain order even during intense crafting sessions.
Deep drawers benefit from stacking organizers or tiered inserts. These create layers within the drawer, multiplying storage capacity. Store frequently used items in the top layer and backup supplies or seasonal materials in the bottom layers. This approach works especially well for paper crafters who need to organize cardstock, patterned paper, and embellishments.
One clever hack: use magnetic sheets on the bottom of shallow containers, then place them in metal drawers. The magnetic hold prevents containers from sliding around when you open and close drawers, keeping your organization system intact even with frequent use.
Repurpose Household Items: Budget-Friendly Storage Solutions
Some of the best craft storage solutions aren’t in the craft aisle at all. Looking at everyday household items through a crafter’s lens reveals incredible organization potential at a fraction of the cost.
Mason jars are the obvious choice, but they truly excel at storing and displaying small supplies. Use them for buttons sorted by color, beads organized by size, or even paint brushes standing upright where you can see and grab them easily. Attach jar lids to the underside of shelves with screws, then twist jars into the lids for space-saving hanging storage that looks intentional and stylish.
Ice cube trays work brilliantly for tiny items like brads, eyelets, or small embellishments. Each compartment holds a different color or style, keeping everything sorted and visible. Stack multiple trays in a drawer or on a shelf for compact organization. The same concept works with pill organizers for beads or findings used in jewelry making.
Empty toilet paper tubes deserve a second life as cord organizers. Wrap electrical cords, ribbon, or string lights around your hand, tuck them inside tubes, and label the outside. Stand tubes upright in a box or drawer for easy identification and access. This method prevents tangling and makes you look like an organizational genius. For more creative ways to transform everyday items, check out our guide to easy DIY crafts that repurpose household materials.
Spice racks, either wall-mounted or countertop versions, create perfect storage for small paint bottles, glitter containers, or ink pads. The tiered design ensures you can see every bottle instead of items hiding behind each other. Dollar store spice racks cost a fraction of specialty craft storage but function identically.
Magazine holders organize more than magazines. Use them to corral rolls of vinyl, store stacks of patterned paper, organize stamps still on their backing sheets, or keep instruction books and patterns upright and accessible. Paint or cover them to match your room’s aesthetic, then line them up on shelves or your desktop.
Create Zones: The Professional Approach to Craft Room Layout
Professional studios organize by function, and your craft room should too. Creating distinct zones for different activities makes your space more efficient and your creative process more enjoyable.
Establish a primary work zone with your largest table or desk, good lighting, and comfortable seating. This is where active projects happen, so keep this surface as clear as possible. Store only your most frequently used tools here – scissors, adhesives, basic writing instruments. Everything else belongs in its designated zone.
Set up a storage zone where bulk supplies and backups live. This might be a closet, a wall of shelving, or a corner with stacked bins. Organize supplies by category – all paper products together, all fabric in one area, all painting supplies in another section. Budget-friendly organization methods can help you create effective storage zones without breaking the bank.
Design a cutting zone with a self-healing mat, rotary cutters, rulers, and scissors within easy reach. If you frequently cut fabric or paper, this dedicated space saves time and protects your other surfaces. Mount a paper trimmer to the wall or edge of a table to keep it accessible but out of the way when not in use.
Consider a project planning zone with a bulletin board, whiteboard, or wall calendar where you map out upcoming projects, pin inspiration, and track deadlines for gifts or commissioned work. This visual planning space keeps creative ideas from getting lost in the shuffle of daily life and helps you stay focused on completing projects instead of just starting them.
Maintenance Systems: Keeping Organization Intact
The most beautifully organized craft room falls apart without simple maintenance habits. Building these practices into your routine prevents the slow slide back into chaos.
Implement a “touch it once” rule during crafting. When you finish using scissors, put them back in their spot immediately instead of setting them down on the table. When you’re done with a ribbon spool, return it to its container before grabbing the next supply. This real-time organization prevents the avalanche of cleanup that makes you avoid crafting altogether.
End each crafting session with a ten-minute reset. Set a timer, put on energizing music, and return everything to its home. Ten minutes feels manageable instead of overwhelming, and you’ll start your next session with a clean slate instead of wasting creative time on cleanup.
Schedule a quarterly deep organization session where you reassess what’s working and what isn’t. Maybe those clear bins aren’t the right size anymore. Perhaps you’ve accumulated too many supplies in one category and need to add storage. Your craft room should evolve with your creative interests, not stay static.
Use the “one in, one out” principle for supplies that tend to multiply – patterned paper, fabric scraps, ribbon, and embellishments. When you bring home new materials, commit to using up or donating something from your existing stash. This prevents supply hoarding and ensures you actually use what you buy.
Your craft room organization journey doesn’t have to happen overnight. Start with one hack that addresses your biggest pain point, then build from there. The goal isn’t perfection – it’s creating a space that supports your creativity instead of hindering it. When you can find what you need quickly, when supplies are visible and accessible, and when cleanup doesn’t feel like punishment, you’ll craft more often and enjoy it more fully. That’s what organization is really about: removing barriers between you and the creative work you love.
Leave a Reply